Your Arduino loop() Runs One Task. ESP-IDF Runs Ten — Here's How Arduino Loop Vs ESP-IDF Multitasking using FreeRTOS
The Moment It Clicked for Me
I was running a demo at a training session — engineers from a large manufacturing company, people who had been writing code for years. I asked them to blink an LED every 500ms and simultaneously read a temperature sensor every 200ms and send data over UART every 1 second.
Using Arduino.
They stared at me like I'd asked them to ride a unicycle and juggle simultaneously.
Because in Arduino's model, you literally can't do that cleanly. Not without hacks. Not without your timing going sideways the moment one task takes a millisecond longer than expected.
Then I showed them the same thing in ESP-IDF with FreeRTOS. Three tasks, running in parallel, each minding its own business. Clean. Predictable. Production-grade.
That's the gap we're talking about today.
What Actually Happens Inside loop()
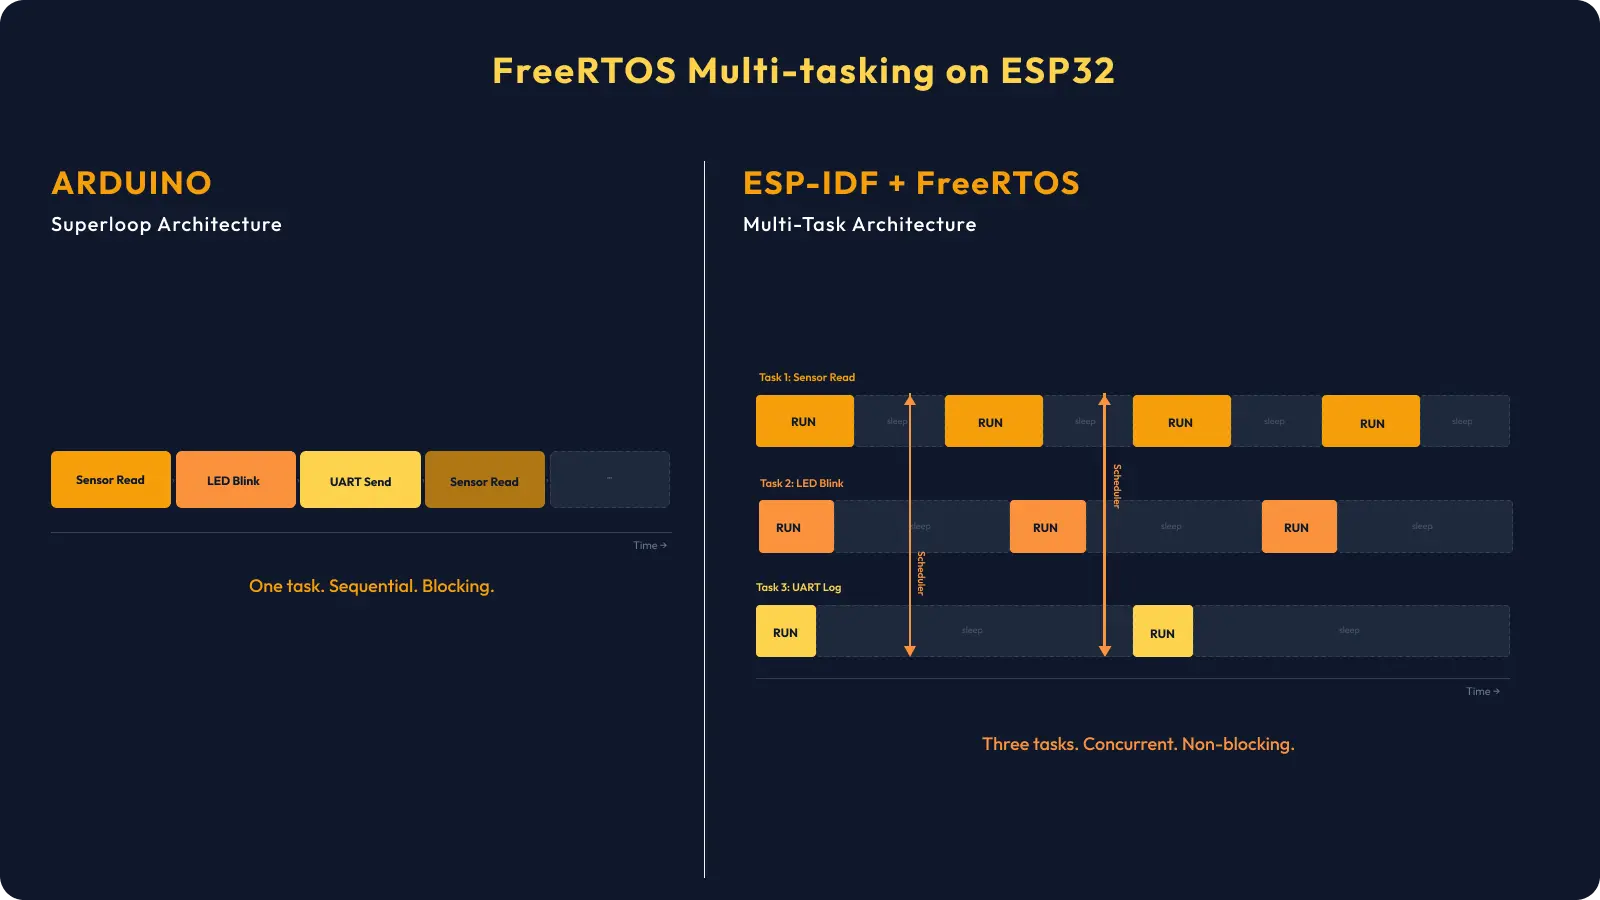
Let's be honest about what Arduino's loop() is: it's an infinite while(true) loop running on bare metal. No operating system. No scheduler. Just your code, running top to bottom, over and over.
void loop() {
  readSensor();      // takes 5ms
  sendUART();        // takes 10ms
  blinkLED();        // wants to happen every 500ms
  // ...and everything blocks everything else
}
This is called superloop architecture. It works perfectly for simple projects — blink an LED, read a button. But the moment your project has multiple things happening at different rates, you're in trouble.
Your LED wants to blink every 500ms. Your sensor wants to be read every 200ms. Your UART wants to send every 1 second. In a superloop, you have to manually track timing with millis() for each of these. And if one function takes too long — maybe your sensor is slow, maybe UART is backed up — everything else gets delayed.
This is not how production embedded systems work.
Enter ESP-IDF and FreeRTOS
The ESP32 is not just a beefed-up Arduino board. It's a dual-core 240MHz processor running FreeRTOS — a real-time operating system. ESP-IDF (Espressif IoT Development Framework) is the official SDK that gives you full access to everything the chip can do.
FreeRTOS gives you tasks — think of them as mini-programs running simultaneously, each with their own stack, their own priority, their own timing. The FreeRTOS scheduler decides which task runs when, switching between them so fast it feels like true parallelism (on the ESP32's dual core, you actually get true parallelism for two tasks at once).
Here's the key mental shift:
Arduino thinks in functions. ESP-IDF thinks in tasks.
Let's Build It — 3 Tasks Running Simultaneously
We'll create three tasks:
- LED Blink Task — blinks every 500ms
- Sensor Read Task — "reads" a simulated sensor every 200ms
- UART Log Task — logs system status every 1 second
Hardware Required
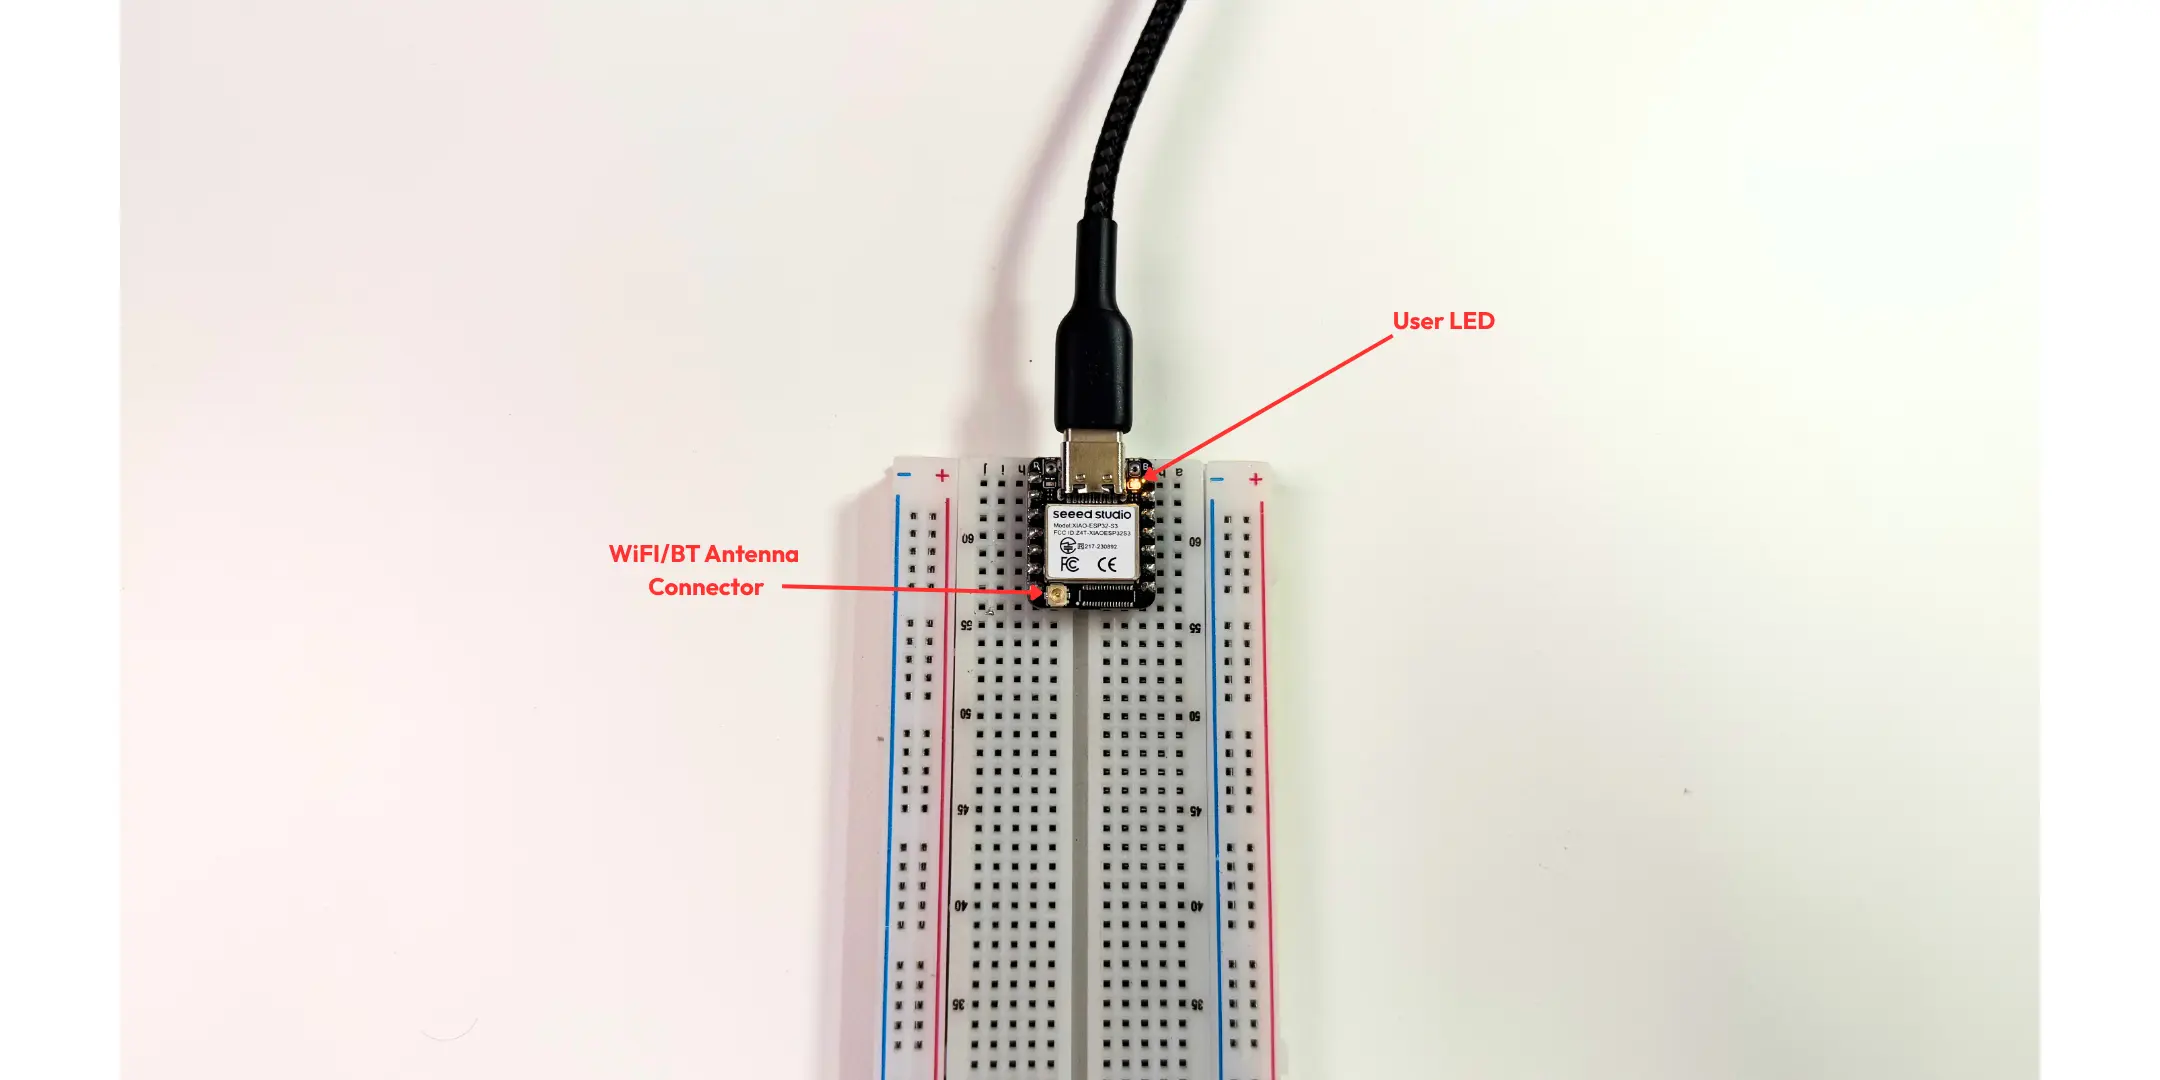
- Seeed Studio XIAO ESP32-S3 (or any ESP32 variant)
- Built-in LED (or external LED on GPIO 21 with 330Ω resistor)
- USB cable
- ESP-IDF v6.x installed
Project Structure
multitask_demo/
├── CMakeLists.txt
├── main/
│   ├── CMakeLists.txt
│   └── main.c
The Code
// main/main.c

#include <stdio.h>
#include "freertos/FreeRTOS.h"   // Core FreeRTOS definitions — must always be first
#include "freertos/task.h"       // xTaskCreate(), vTaskDelay(), TaskHandle_t
#include "driver/gpio.h"         // gpio_config(), gpio_set_level()
#include "esp_log.h"             // ESP_LOGI(), ESP_LOGW(), ESP_LOGE()
#include "esp_system.h"          // esp_get_free_heap_size()

// =============================================================================
// CONFIGURATION
// =============================================================================

// GPIO pin for the onboard LED on XIAO ESP32-S3
// Change this to GPIO_NUM_2 for standard ESP32 DevKit boards
#define LED_PIN GPIO_NUM_21

// Log tag — appears as the component name in the serial monitor output
// e.g. "I (335) MULTITASK: [SENSOR] Value: 1"
static const char *TAG = "MULTITASK";

// =============================================================================
// TASK 1 — LED BLINK
// Toggles the onboard LED ON/OFF every 500ms independently of all other tasks.
//
// xTaskCreate() params used:
//   Stack : 2048 bytes — sufficient for simple GPIO operations
//   Priority : 3 — highest of the three tasks; LED timing should be tight
// =============================================================================
void led_blink_task(void *pvParameters) {

    // Configure GPIO 21 as a push-pull output
    // gpio_config_t is a struct — set only what you need, rest defaults to 0
    gpio_config_t io_conf = {
        .pin_bit_mask = (1ULL << LED_PIN),  // Bitmask: select GPIO 21
        .mode         = GPIO_MODE_OUTPUT,   // Set as output
        .pull_up_en   = GPIO_PULLUP_DISABLE,
        .pull_down_en = GPIO_PULLDOWN_DISABLE,
        .intr_type    = GPIO_INTR_DISABLE,  // No interrupt needed
    };
    gpio_config(&io_conf);

    ESP_LOGI(TAG, "LED Blink Task started — Core %d", xPortGetCoreID());

    while (1) {
        gpio_set_level(LED_PIN, 1);             // LED ON
        vTaskDelay(pdMS_TO_TICKS(500));         // Yield CPU for 500ms — other tasks run during this time

        gpio_set_level(LED_PIN, 0);             // LED OFF
        vTaskDelay(pdMS_TO_TICKS(500));         // Yield CPU for 500ms again

        // Total cycle: 1000ms = 1Hz blink rate
        // vTaskDelay() is NOT the same as delay() —
        // it yields the CPU to the scheduler instead of burning cycles
    }
}

// =============================================================================
// TASK 2 — SENSOR READ (SIMULATED)
// Reads a sensor value every 200ms and logs it to UART.
//
// Currently simulated with a counter (0–99, wraps around).
// To use a real sensor — replace the simulation block with your
// actual ADC read, I2C read, or SPI transaction.
//
// xTaskCreate() params used:
//   Stack : 2048 bytes — sufficient for logging and simple arithmetic
//   Priority : 2 — mid priority; sensor reads are important but not critical
// =============================================================================
void sensor_read_task(void *pvParameters) {

    // sensor_value is a local variable — stored on THIS task's stack
    // Each FreeRTOS task has its own stack, so no conflict with other tasks
    int sensor_value = 0;

    ESP_LOGI(TAG, "Sensor Read Task started — Core %d", xPortGetCoreID());

    while (1) {
        // ── SIMULATED SENSOR READ ─────────────────────────────────────────
        // Replace this block with your real sensor read, for example:
        //   int sensor_value = adc1_get_raw(ADC1_CHANNEL_0);        // ADC
        //   i2c_master_read_slave(i2c_num, data, len);              // I2C
        //   spi_device_transmit(spi_handle, &transaction);          // SPI
        sensor_value = (sensor_value + 1) % 100;
        // ─────────────────────────────────────────────────────────────────

        // Log the value — visible in idf.py monitor
        ESP_LOGI(TAG, "[SENSOR] Value: %d°C (simulated)", sensor_value);

        // Yield CPU for 200ms — LED task and UART task can run during this time
        vTaskDelay(pdMS_TO_TICKS(200));
    }
}

// =============================================================================
// TASK 3 — UART STATUS LOG
// Logs system health (free heap + uptime) every 1 second.
// Useful for detecting memory leaks (free heap shrinking over time = leak).
//
// xTaskCreate() params used:
//   Stack : 4096 bytes — larger because ESP_LOGI with multiple format args
//           uses more stack than simple GPIO operations
//   Priority : 1 — lowest priority; logging is not time-critical
// =============================================================================
void uart_log_task(void *pvParameters) {

    int log_count = 0;

    ESP_LOGI(TAG, "UART Log Task started — Core %d", xPortGetCoreID());

    while (1) {
        // esp_get_free_heap_size() returns current free internal heap in bytes
        // If this number keeps dropping over time → you have a memory leak
        ESP_LOGI(TAG,
                 "[STATUS] Log #%d | Heap Free: %lu bytes | Uptime: %lu ms",
                 log_count++,
                 (unsigned long)esp_get_free_heap_size(),
                 (unsigned long)(xTaskGetTickCount() * portTICK_PERIOD_MS));

        // Yield CPU for 1 second
        vTaskDelay(pdMS_TO_TICKS(1000));
    }
}

// =============================================================================
// APP_MAIN — ENTRY POINT
// In ESP-IDF, app_main() replaces main(). It runs as a FreeRTOS task itself
// at a default priority. Once all tasks are created and app_main() returns,
// the FreeRTOS scheduler takes full control and runs your tasks indefinitely.
// =============================================================================
void app_main(void) {

    ESP_LOGI(TAG, "=== FreeRTOS Multi-Task Demo ===");
    ESP_LOGI(TAG, "Chip: ESP32-S3 | Cores: 2 | FreeRTOS Tick: %d Hz",
             configTICK_RATE_HZ);

    // ── CREATE TASK 1: LED Blink ──────────────────────────────────────────
    // xTaskCreate(function, name, stack_bytes, params, priority, handle)
    //   function    : led_blink_task — the task's entry function
    //   name        : "LED_Blink"   — shown in debugger / task list
    //   stack_bytes : 2048          — per-task stack, not shared
    //   params      : NULL          — no parameters passed
    //   priority    : 3             — highest of the three tasks
    //   handle      : NULL          — not needed; we won't suspend/delete it
    xTaskCreate(led_blink_task, "LED_Blink", 2048, NULL, 3, NULL);

    // ── CREATE TASK 2: Sensor Read ────────────────────────────────────────
    xTaskCreate(sensor_read_task, "Sensor_Read", 2048, NULL, 2, NULL);

    // ── CREATE TASK 3: UART Log ───────────────────────────────────────────
    // Stack is 4096 (not 2048) because ESP_LOGI with multiple format
    // specifiers (%d, %lu, %lu) uses more stack than a simple GPIO write
    xTaskCreate(uart_log_task, "UART_Log", 4096, NULL, 1, NULL);

    ESP_LOGI(TAG, "All 3 tasks created — FreeRTOS scheduler now running");

    // app_main() returns here — FreeRTOS scheduler takes over
    // The three tasks above will now run indefinitely, each on their
    // own schedule, yielding to each other via vTaskDelay()
}
CMakeLists.txt (project root)
cmake_minimum_required(VERSION 3.16)
include($ENV{IDF_PATH}/tools/cmake/project.cmake)
project(multitask_demo)
CMakeLists.txt (main/)
idf_component_register(SRCS "main.c"
                    INCLUDE_DIRS ".")
Build and Flash
# Set your target (XIAO ESP32-S3 uses esp32s3)
idf.py set-target esp32s3

# Build
idf.py build

# Flash + Monitor (replace with your actual port)
idf.py -p /dev/ttyUSB0 flash monitor
What You'll See
I (320) MULTITASK: Starting Multi-Task Demo on ESP32
I (330) MULTITASK: [SENSOR] Value: 1
I (530) MULTITASK: [SENSOR] Value: 2
I (730) MULTITASK: [SENSOR] Value: 3
I (830) MULTITASK: [STATUS] Log #0 | Heap Free: 284000 bytes
I (930) MULTITASK: [SENSOR] Value: 4
...
The LED is blinking independently. The sensor is reading every 200ms. The status log fires every second. All at the same time. No blocking. No timing hacks.

Breaking Down xTaskCreate() — The One Function That Changes Everything
xTaskCreate(
    led_blink_task,    // Function pointer — the task code
    "LED_Blink",       // Name (for debugging in Task Manager)
    2048,              // Stack size in bytes — how much memory this task gets
    NULL,              // Parameter to pass into the task (pvParameters)
    3,                 // Priority — higher number = higher priority
    NULL               // Task handle (NULL if you don't need to reference it later)
);
Stack size is something Arduino developers never think about because there's only one stack. In FreeRTOS, each task has its own stack. Too small → stack overflow → crash. Too big → wasted RAM. 2048 bytes is a safe starting point for simple tasks. If your task uses printf, local arrays, or calls deep functions, increase it.
Priority matters when two tasks are both ready to run. Higher priority wins. The IDLE task runs at priority 0 — never go below that. Keep your priorities sensible: critical tasks get higher numbers.
vTaskDelay(pdMS_TO_TICKS(500)) is the FreeRTOS way to "wait." It tells the scheduler: "I'm done for 500ms, give CPU time to someone else." This is fundamentally different from delay(500) in Arduino, which burns CPU cycles doing nothing useful. vTaskDelay yields. delay() wastes.
The vTaskDelay vs delay() Problem — This One Matters in Production
In Arduino:
delay(500); // CPU sits here doing NOTHING. All other "tasks"? Blocked.
In FreeRTOS:
vTaskDelay(pdMS_TO_TICKS(500)); // This task sleeps. Scheduler gives CPU to others.
For a hobbyist blinking an LED, this doesn't matter. For a system where you're reading a sensor, handling Bluetooth, managing a display, and sending data to a cloud endpoint — it's the difference between a system that works and a system that constantly misses events.
In India's manufacturing sector, I've seen PLCs replaced with ESP32-based solutions. Those systems run 24/7. A blocking delay() in a critical sensor task isn't acceptable there. FreeRTOS tasks with proper vTaskDelay are.
Task Communication — How Tasks Talk to Each Other
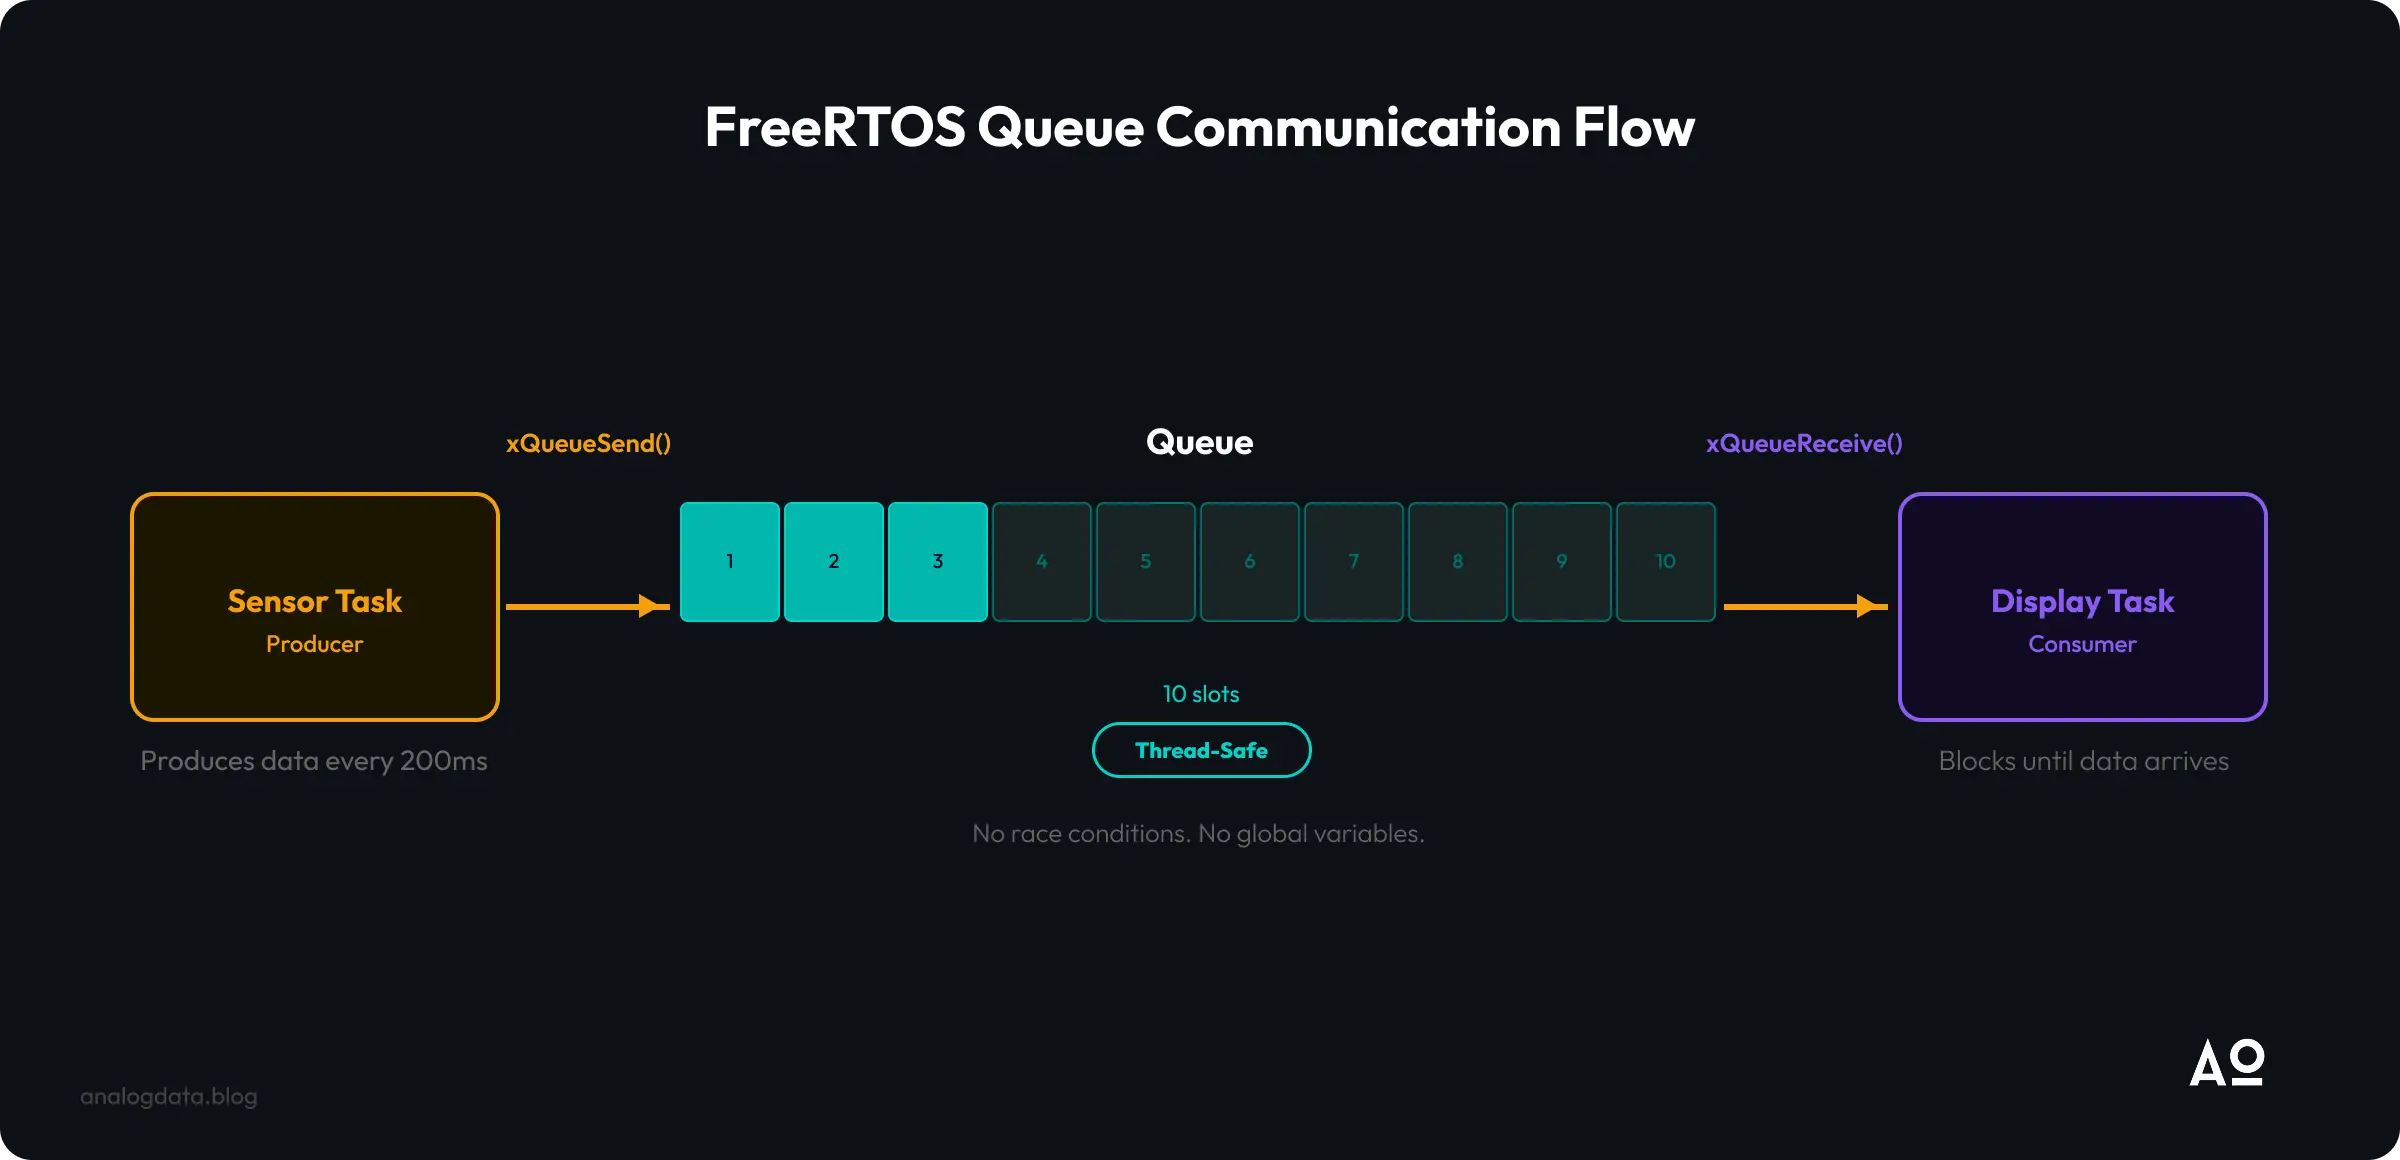
Tasks don't run in isolation in real systems. They share data. FreeRTOS gives you several tools for this:
Queues — The Right Way to Share Data Between Tasks
#include <stdio.h>
#include "freertos/FreeRTOS.h"
#include "freertos/task.h"
#include "freertos/queue.h"
#include "esp_log.h"

static const char *TAG = "QUEUE_DEMO";
QueueHandle_t sensor_queue;

// ── Simulated sensor read ──────────────────────────────────────────────
// Replace this with your actual ADC / I2C / SPI read
int read_sensor(void) {
    static int simulated_value = 0;
    simulated_value = (simulated_value + 1) % 100;
    return simulated_value;
}

// ── Simulated display update ───────────────────────────────────────────
// Replace this with your actual OLED / LCD / TFT update call
void update_display(int value) {
    ESP_LOGI(TAG, "[DISPLAY] Showing value: %d", value);
    // e.g. ssd1306_draw_int(value);
    // e.g. lvgl_label_set_text(label, value);
}

// ── Producer: reads sensor, pushes to queue ────────────────────────────
void sensor_producer_task(void *pvParameters) {
    int value;
    while (1) {
        value = read_sensor();
        ESP_LOGI(TAG, "[PRODUCER] Sending: %d", value);

        if (xQueueSend(sensor_queue, &value, pdMS_TO_TICKS(10)) != pdTRUE) {
            ESP_LOGW(TAG, "[PRODUCER] Queue full — sample dropped");
        }
        vTaskDelay(pdMS_TO_TICKS(200));
    }
}

// ── Consumer: pulls from queue, updates display ────────────────────────
void display_consumer_task(void *pvParameters) {
    int received_value;
    while (1) {
        if (xQueueReceive(sensor_queue, &received_value, pdMS_TO_TICKS(300)) == pdTRUE) {
            update_display(received_value);
        } else {
            ESP_LOGW(TAG, "[CONSUMER] No data in 300ms — timeout");
        }
    }
}

// ── Entry point ────────────────────────────────────────────────────────
void app_main(void) {
    ESP_LOGI(TAG, "Boot — FreeRTOS Queue Demo");

    sensor_queue = xQueueCreate(10, sizeof(int));

    if (sensor_queue == NULL) {
        ESP_LOGE(TAG, "Failed to create queue — halting");
        return;
    }

    xTaskCreate(sensor_producer_task, "Producer", 2048, NULL, 2, NULL);
    xTaskCreate(display_consumer_task, "Consumer", 4096, NULL, 1, NULL);
}
This is thread-safe. No global variable races. No data corruption. This is how production IoT firmware is written.
Why This Matters for You
India is building. Smart agriculture. Industry 4.0 factories in Pune and Surat. Smart meters rolling out across UP and Maharashtra under RDSS. Smart city infrastructure from Kochi to Lucknow.
Every one of these systems needs embedded firmware that can handle multiple things simultaneously — reading sensors, communicating over 4G/NB-IoT, managing local storage, updating OTA, and doing it all without a crash.
The companies doing this seriously — Bosch, Siemens, Tata Elxsi, Wipro's embedded division, dozens of product startups in Bengaluru and Hyderabad — they're not writing Arduino sketches for production. They're using ESP-IDF, Zephyr, or bare-metal RTOS. If you want to be hireable in this space or build products that actually work at scale, you need to understand FreeRTOS.
An ESP32-S3 module costs ₹250–400. The development tools are free. There is no excuse not to learn this.
Key Takeaways
- Arduino's
loop()is a superloop — one task, sequential, blocking. Good for hobby projects. Not for production. - FreeRTOS tasks are independent execution units — each has its own stack, priority, and timing. The scheduler handles the rest.
vTaskDelay()yields the CPU —delay()wastes it. In a multi-task system, this is not optional knowledge.- Queues are the safe way to share data between tasks. Global variables without protection = data races = random crashes.
- The ESP32 runs FreeRTOS natively — you're not adding an OS on top, you're using what's already there. ESP-IDF is built around it.
- This is production-grade thinking — the same patterns used in IoT products shipping to thousands of users across India and globally.
What's Next
If this clicked for you, the next step is getting hands-on with a real board and building something that actually does multiple things at once — sensor fusion, BLE + Wi-Fi simultaneous, or TinyML inference running alongside data collection.
That's exactly what we cover in depth at our 2-Day Hands-On Workshop: "AI on the Edge with IoT — Using ESP32 & IDF".
Register here → edgeai.analogdata.io
We use the Seeed Studio XIAO ESP32-S3, ESP-IDF v5.x, and on Day 2 we run actual TinyML models on the edge. Limited seats. Bengaluru-based.
More from Analog Data:
- 📚 Deep-dive courses: build.analogdata.io
- 🤖 AI/ML training: analogdata.ai
- 🌐 Everything we do: analogdata.io
- ✍️ More posts like this: analogdata.blog
Frequently Asked Questions
Quick answers to common questions
Master EdgeAI, IoT & Embedded
Master Embedded Systems & IoT by building production-ready firmware — not toy demos. ESP-IDF, FreeRTOS, TinyML, and AWS IoT.
Sub: ESP-IDF
Projects and deep dives on Espressif's ESP32 family of microcontrollers covering ESP-IDF, FreeRTOS, Wi-Fi, BLE, TinyML, and production-grade firmware development.
Get Analog Data in your inbox
Practical breakdowns on AI, edge, infra, and playbooks from the team that ships them. One concise email each week.
What you get
New articles, teardown summaries, and code snippets.
What you don’t
No spam. No forwarded press. Unsubscribe anytime.
Join the list
1,350+ subscribers
We respect your inbox. Unsubscribe anytime.